Installing a wetroom can transform your bathroom into a modern, stylish, and functional space. Wetrooms are particularly popular in the UK for their sleek design and ease of maintenance. This guide will walk you through the process of installing a wetroom step by step, ensuring you have the knowledge and confidence to tackle the project. We’ll also provide links to high-quality products from The Tilers Hub that you’ll need to complete the installation.
1. Planning and Design
a. Assess the Space
- Measure the Area: Begin by measuring the dimensions of your bathroom. Wetrooms can be designed to fit both large and small spaces, but careful planning is crucial, especially in smaller bathrooms. Ensure there is sufficient space for the shower area, with adequate drainage.
- Ventilation Considerations: Proper ventilation is vital in a wetroom to prevent moisture buildup, which can lead to mould and dampness. If your bathroom isn’t already equipped with a high-quality extractor fan, this is the time to plan for one.
- Accessibility: Consider whether your wetroom needs to be accessible for individuals with mobility issues. This may influence your choice of fixtures and the layout of the room, such as opting for level entry showers and wider spaces.
b. Choose Materials
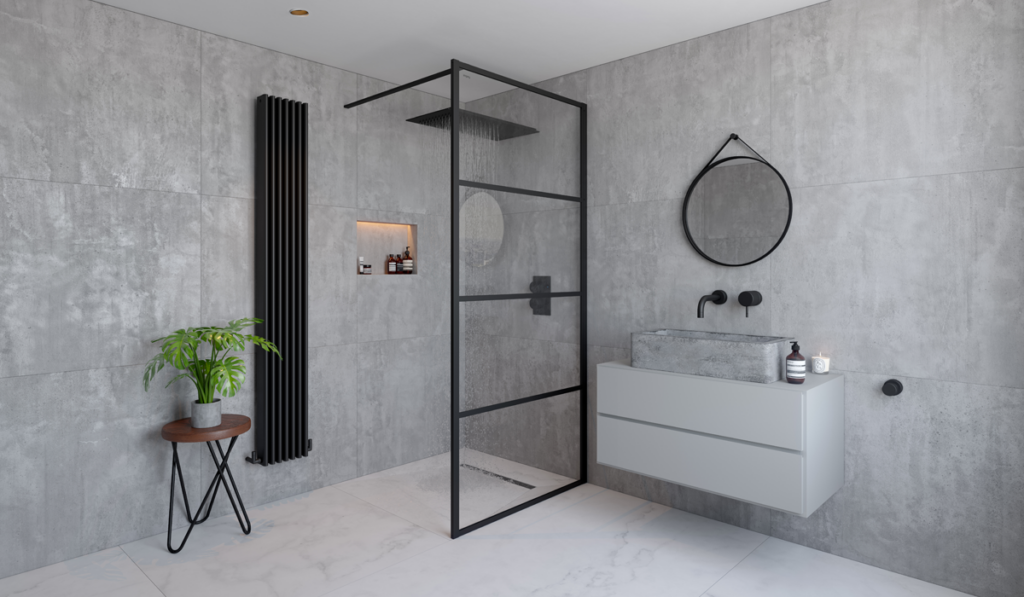
- Waterproofing Membrane: A waterproof membrane, often referred to as a tanking kit, is essential for a wetroom. It acts as a barrier to prevent water from leaking through the floor and walls. You can find top-quality tanking kits at The Tilers Hub.
- Flooring: The floor in a wetroom should be slip-resistant and waterproof. Tiles are a popular choice, but they must be laid on a surface that slopes gently towards the drain to avoid water pooling. A wetroom tray from The Tilers Hub can help create the correct gradient.
- Wall Cladding: For the walls, choose waterproof tiles or panels that match your design aesthetic. Tile backer boards are ideal for creating a solid, waterproof base for tiling.
- Drainage: Selecting the right drain is crucial for efficient water removal. Consider installing wetroom wastes to ensure effective drainage.
c. Layout Design
- Positioning the Shower: Place the shower in a way that minimises water splash to the rest of the room. You may want to install a glass screen or partition to contain the water within the shower area.
- Fixture Placement: Plan the positioning of fixtures such as the toilet and sink to avoid excessive water exposure. Wall-mounted fixtures are ideal for wetrooms as they free up floor space and make cleaning easier.
2. Preparing the Space
a. Clear the Area
- Remove Existing Fixtures: Start by removing any old bathroom fixtures, tiles, and flooring. This will provide a clean slate for your wetroom installation.
- Inspect Subfloor: Check the condition of the subfloor. If it’s damaged, it will need to be repaired or replaced before proceeding with the installation.
b. Install a Subfloor
- Apply a Sloped Subfloor: If your current subfloor isn’t sloped, you’ll need to install a sloped base or use a wetroom tray from The Tilers Hub to guide water towards the drain. This ensures that water flows directly to the drainage point without pooling.
- Reinforce with Tile Backer Boards: After installing the sloped base, reinforce the area with tile backer boards. These boards provide a sturdy, waterproof surface for tiling and prevent moisture from penetrating the subfloor.
c. Install the Drain
- Position the Drain: The drain should be installed at the lowest point of the slope to ensure proper water drainage. Consider using a wetroom waste that fits seamlessly into your design and provides efficient drainage.
- Connect to Plumbing: Connect the drain to your existing plumbing system. Ensure all connections are watertight to prevent leaks.
3. Waterproofing the Wetroom
a. Apply the Tanking Kit
- Prepare the Area: Before applying the tanking kit, ensure the floor and walls are clean, dry, and free from dust or debris. Any cracks or gaps should be filled with an appropriate filler.
- Apply the Waterproof Membrane: Using a brush or roller, apply the waterproof membrane from the tanking kit to all areas that will be exposed to water, including the floor, lower sections of the walls, and any corners or joints. Follow the manufacturer’s instructions for drying times between coats.
- Seal Joints and Corners: Pay special attention to joints and corners, as these are the areas most prone to leaks. Use a waterproof tape included in the tanking kit to reinforce these areas.
b. Install Wall Niches
- Plan Niche Placement: If you want built-in storage in your wetroom, now is the time to install wall niches. These provide convenient storage for toiletries without cluttering the shower area.
- Waterproof the Niches: Just like the rest of the wetroom, niches must be waterproofed to prevent leaks. Apply the tanking kit to the inside surfaces of the niche, ensuring full coverage.
4. Tiling the Wetroom
a. Choose the Right Adhesive
- Select Tile Adhesive: Use a high-quality tile adhesive that’s suitable for wetrooms. The adhesive should be waterproof and flexible to accommodate the movement and moisture levels in a wetroom.
- Apply Adhesive: Apply the adhesive evenly across the backer boards, starting from the bottom and working your way up. This ensures the tiles stay in place and create a watertight seal.
b. Lay the Tiles
- Start with the Floor: Begin tiling the floor, working from the centre outwards to ensure an even layout. Use a tile levelling system to keep tiles flat and prevent lippage.
- Tile the Walls: Once the floor tiles are in place and set, start tiling the walls. Use a level to keep tiles straight and aligned. Make sure to tile around the niches, leaving no gaps.
c. Grouting
- Choose Epoxy Grout: For wetrooms, it’s recommended to use epoxy grout because it is waterproof and resistant to staining and mould. Epoxy grout is more durable than traditional grout and ideal for wet environments.
- Apply the Grout: Apply the grout using a rubber float, pressing it firmly into the joints. Wipe off any excess with a damp sponge before it hardens.
d. Sealing with Silicone
- Seal Edges and Joints: After the grout has cured, use silicone to seal around the edges of the wetroom, including where the walls meet the floor and around the fixtures. This provides an additional layer of protection against water ingress.
- Final Inspection: Once the silicone has set, inspect the entire wetroom for any gaps or areas that need touch-ups.
5. Final Touches and Testing
a. Install Fixtures
- Fit Shower and Accessories: Install your shower, including any necessary fixtures such as the showerhead, controls, and any additional accessories. Make sure everything is securely fitted and properly sealed.
- Test the Drainage: Before using the wetroom, thoroughly test the drainage system by running water through it. Check for any leaks and ensure the water flows efficiently towards the drain.
b. Add Finishing Touches
- Install Storage Solutions: If you’ve added niches or need additional storage, install shelves or cabinets. Ensure they are waterproof and securely attached.
- Decorate: Finally, add any decorative elements such as mirrors, plants, or artwork to personalise your new wetroom.
Conclusion
Installing a wetroom is a fantastic way to modernise your bathroom, offering both style and functionality. By following this step-by-step guide and using the recommended products from The Tilers Hub, you can create a waterproof, durable, and beautiful space that enhances your home.
Whether you’re a DIY enthusiast or hiring a professional, careful planning, quality materials, and attention to detail are key to ensuring your wetroom.